HOMEOWNER RESOURCES
Landscape Lighting Maintenance & Troubleshooting Guides
Keep your outdoor lighting system performing its best with expert maintenance tips, troubleshooting advice, and step-by-step guides. From replacing bulbs and cleaning fixtures to resolving power issues and timer problems, you’ll find practical solutions to the most common landscape lighting concerns.
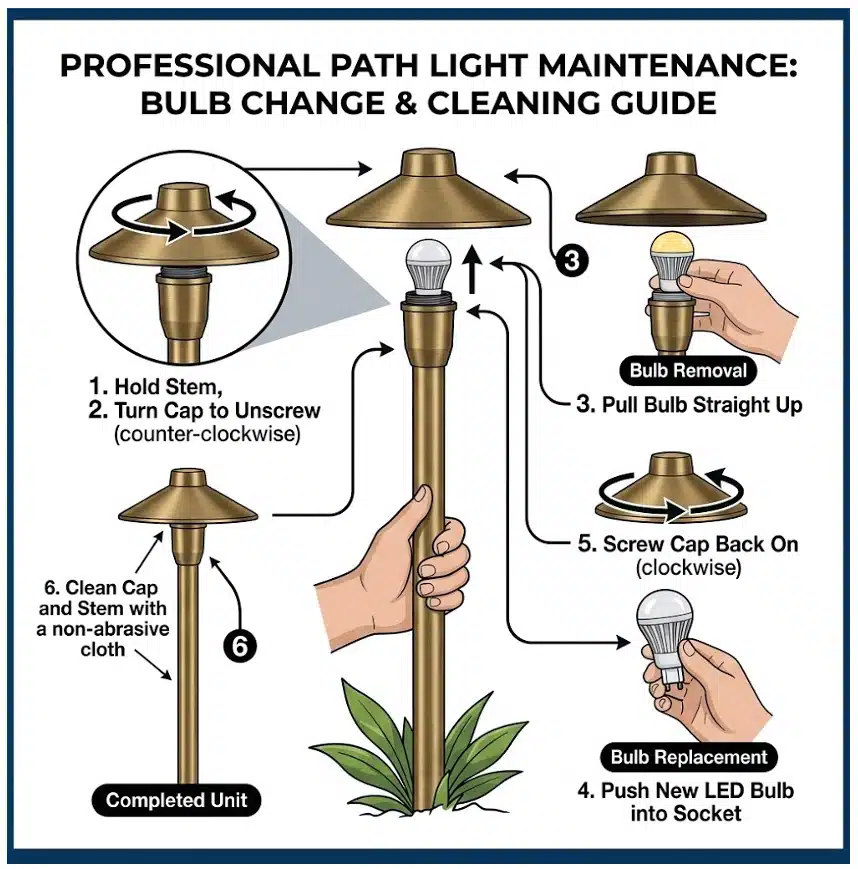
Maintaining your architectural-grade brass fixtures ensures they continue to provide that signature warm glow across your Charlotte property. Follow these steps to safely swap a bulb and refresh the fixture’s appearance.
1. Secure and Open the Fixture
- The “Hold and Twist”: Grasp the brass stem firmly with one hand near the top. This anchors the fixture and prevents the mounting stake from shifting or bending in the soil.
- Unscrew the Cap: With your other hand, turn the top cap (hat) counterclockwise. If the threads are snug due to seasonal oxidation, a gentle tap on the side of the cap can help break the seal before twisting.
2. Bulb Removal and Replacement
- Remove the Old Bulb: Once the cap (and any protective internal lens) is removed, pull the LED bulb straight up and out of the socket. Do not twist bi-pin bulbs.
- Install the New LED: Align the pins of your new 2700K Warm White LED and push it firmly into the socket.
3. Reassembly and Weatherproofing
- Close the Fixture: Thread the cap back onto the stem, turning clockwise until snug. Do not overtighten; a firm finger-tight seal is sufficient to keep humidity out.
4. Final Cleaning and Polishing
- Refresh the Brass: Use a soft, non-abrasive microfiber cloth to wipe down the cap and stem. This removes fingerprints, water spots, and garden debris.
- The Result: Regular cleaning prevents mineral buildup and allows the natural brass or copper to patina beautifully and evenly over the years.
1. Separate the Two Halves
- Grip the upper body (hood/lens section) and the lower body (base).
- These fixtures use a friction-fit connection at the mid-body seam (grooved section).
- Twist counterclockwise approximately ½ turn to unlock the upper half.
- If the fixture is tight due to the O-ring seal, use a rubber grip for added traction.
- Avoid using pliers to prevent damage to the brass finish.
2. Access and Remove the Bulb
- Once opened, locate the MR16 LED bulb, secured by a spring clip or compression spring.
- Carefully release the clip if needed, then pull the bulb straight out of the bi-pin socket.
- Do not twist the bulb during removal.
3. Install the New Bulb
- Insert the new MR16 LED bulb firmly into the socket pins.
- Reposition the spring clip so it holds the bulb securely in place.
- Ensure the bulb is centered and fully seated for proper beam alignment.
4. Inspect Seals Before Reassembly
- Check the silicone O-rings around the lens and body—these maintain the fixture’s weather resistance.
- Ensure they are clean and free of debris.
- Ensure they are properly seated (not twisted).
- Inspect for cracks or damage.
- Apply a light coat of silicone grease if needed to improve sealing and ease future servicing.
5. Reattach the Upper Half
- Align the fixture halves and reassemble.
- Twist clockwise until snug—do not overtighten.
- Set the hood orientation as desired before final tightening.
6. Restore Power and Test
- Turn the transformer back on.
- Confirm the fixture is operating correctly.
7. Aiming the Light
- Adjust the fixture using the knuckle joint near the base.
- Wall grazing: Use a shallow angle to highlight texture.
- Uplighting: Aim approximately 1/3 up the surface or feature.
- Fine-tune using the bulb’s beam spread (spot vs. flood).
- Secure the position by tightening the adjustment point if applicable.
Pro Tip
- After dark, step back 20–30 feet and evaluate the lighting effect.
- Small adjustments in angle can significantly improve appearance and reduce glare or hot spots.

Dark bronze fixtures provide a timeless, sophisticated look that seamlessly blends into nighttime landscaping. Whether your fixtures are crafted from solid brass with a chemically applied oil-rubbed bronze finish or high-quality architectural aluminum, they require periodic care. Over time, exposure to hard water sprinklers, lawn fertilizers, and environmental dust can leave a chalky white residue that dulls their deep, rich luster.
What Is a GFI Outlet?
A GFI outlet (also called a GFCI outlet, which stands for Ground Fault Circuit Interrupter) is a special electrical outlet designed to protect people from electrical shock.
These outlets continuously monitor the flow of electricity through a circuit. If a GFI detects electricity flowing where it should not—such as through water or a person—it immediately shuts off power in a fraction of a second.
GFI outlets are commonly installed in areas where moisture may be present, including:
- Bathrooms
- Kitchens
- Garages
- Outdoor locations
- Basements
- Laundry rooms
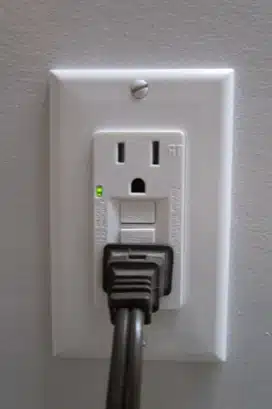
A GFI outlet is easy to recognize because it has two buttons on the front labeled:
- TEST
- RESET
Why Do GFI Outlets Trip?
A GFI outlet trips when it senses an unsafe electrical condition. Common causes include:
1. Moisture or Water Exposure
Water near an outlet or electrical fixture can create a ground fault and cause the outlet to trip.
2. Overloaded Circuits
Too many devices operating on the same circuit can sometimes contribute to nuisance tripping. In many homes, the GFI controlling landscape lighting transformers may be located inside a garage, on an exterior wall, or near pool equipment.
3. Outdoor Electrical Problems
Outdoor outlets, lighting systems, and irrigation wiring are especially vulnerable to moisture intrusion and damaged wiring.
Power surges can also cause a GFI to trip. These surges may originate from utility power entering the home or from nearby lightning strikes.
How to Identify a Tripped GFI Outlet
When a GFI outlet trips, power to the outlet—and possibly other outlets connected downstream—will shut off.
Signs that a GFI has tripped include:
- The RESET button appears popped outward
- No power is present at nearby outlets
- Outdoor lighting stops functioning
- A red indicator light may be illuminated
For outdoor lighting systems, check the outlet where the transformer is plugged in.
Important: If numbers are displayed on the timer, that does not necessarily mean the outlet has power. Most timers contain backup batteries that keep the display active even when power is lost.
To test the outlet:
- Unplug the timer.
- Disconnect the transformer from the timer.
- Plug the transformer directly into the outlet.
If the outlet is receiving power, the landscape lights should turn on. If they do not, the outlet may be dead due to a tripped GFI or another electrical issue.
How to Reset a GFI Outlet
Step 1: Locate the GFI Outlet
Look in bathrooms, kitchens, garages, basements, utility rooms, or exterior walls for an outlet that has TEST and RESET buttons.
Step 2: Press the RESET Button
Firmly press the RESET button until it clicks into place.
Step 3: Verify Power Has Been Restored
Plug in a lamp or outlet tester to confirm that power has returned.
Step 4: If the Outlet Will Not Reset
If the GFI immediately trips again or will not reset:
- There may be a wiring problem.
- Moisture may still be present.
- A faulty device may still be connected.
- The GFI outlet itself may be defective.
Like any electrical device, GFI outlets can wear out over time and may eventually need to be replaced.
If the outlet continues to trip or will not reset, contact a qualified electrician for further diagnosis and repair.

Replacing the backup batteries on Intermatic DT620 or DT200 series digital plug-in timers is a quick process that keeps your programmed schedules intact during power outages.
What You Need
- Two (2) LR44 (or L1154/SR44) button cell batteries
- A small, non-metallic pry tool (like a plastic pen cap or a toothpick)
- A paperclip
Step-by-Step Replacement
- Unplug the Timer: For safety, completely remove the unit from the wall outlet before starting.
- Access the Battery Compartment: Locate the small battery tray door on the back or side of the unit. Use your non-metallic pry tool to gently pop the tray loose and pull it out.
- Remove Old Batteries: Use the end of a paperclip to slide or lift the spent button cells out of the holder tray.
- Check the Contacts: Look inside the empty tray. If the internal metal tabs seem loose, use a toothpick or paperclip to very slightly bend the contacts outward to ensure solid connection tension for the new cells.
- Insert New Batteries: * Place the first LR44 battery into the holder plus (+) side down.
- Stack the second LR44 battery directly on top of it, also plus (+) side down.
- Ensure the orientation matches the small configuration diagram molded inside the holder.
- Reinstall the Holder: Slide the loaded battery tray back into the timer body until it clicks flush. The plus/minus indicators on the outside of the door should face toward the electrical prongs.
- Verify and Plug In: Check the digital screen. If the display turns on or stops flashing a “LO” battery indicator, the replacement was successful. Plug the timer back into the wall outlet.
Note: The internal memory will typically save your custom schedules for about one minute while the batteries are completely out. Work efficiently so you won’t have to reprogram your astronomic clock settings!
To see a close-up of the battery drawer removal and proper cell placement, check out this Intermatic Timer Battery Replacement Video. This short visual guide walks through finding the orientation grooves on the backup compartment so you don’t accidentally force the tray in backwards.
Overview
Outdoor 12v lighting fixturess commonly use an 8-inch plastic or composite stake that anchors the fixture into the ground. Over time, stakes can become brittle, crack, or break due to weather exposure, lawn maintenance, or accidental impact. Replacing the stake is a straightforward repair, but it is important to reconnect the wiring properly and use new waterproof connectors to prevent future moisture-related failures.
Tools and Materials Needed
- Replacement 8-inch landscape lighting stake
- Waterproof direct-burial wire connectors
- Wire strippers/cutters
- Small shovel or hand trowel
- Screwdriver (if required by fixture design)
- Work gloves
Step 1 – Turn Off Power
Before beginning any work, turn off power to the low-voltage landscape lighting transformer. Verify that the fixture is not illuminated before handling any wiring.
Step 2 – Remove the Fixture from the Ground
- Carefully pull the path light fixture and damaged stake from the soil.
- Use a small shovel if necessary to loosen compacted soil around the stake.
- Expose several inches of wiring below the fixture.
Typical Assembly
Step 3 – Disconnect Existing Wiring
The fixture wires typically exit from the bottom of the stem and pass through the open channels of the stake.
A typical path light will have:
- One positive wire
- One negative wire
Depending on the wiring method, there may be two or three wire connections at the base of the fixture.
Cut and remove the old wire connectors.
Wiring Layout
Connector
Connector
If a third wire connection exists, reconnect it exactly as originally installed.
Step 4 – Remove the Old Stake
Once the wires are disconnected:
- Slide the broken stake off the fixture stem.
- Pull the fixture wires out through the openings in the old stake.
- Inspect the wires for damage and trim back any corroded sections.
Stake Cross Section
Pass
Area
The fixture wires must route through the open sections of the replacement stake before reconnection.
Step 5 – Install the New Stake
- Feed the fixture wires down through the center and open channels of the new stake.
- Slide the stake onto the fixture stem until fully seated.
- Ensure the stake is straight and securely attached.
Wire Routing Through Stake
Channel
Wires
Step 6 – Reconnect Wiring
Using new waterproof direct-burial connectors, reconnect all wires exactly as they were originally configured.
Important:
- Use only connectors rated for underground landscape lighting.
- Do not reuse old connectors.
- Ensure copper conductors are fully inserted.
- Tighten or crimp according to manufacturer instructions.
Waterproof Connection Example
New waterproof connectors help guarantee a watertight seal and reduce future corrosion problems.
Step 7 – Reinstall the Fixture
- Push the new stake firmly into the ground.
- Verify the fixture is vertical and properly aligned with adjacent path lights.
- Backfill soil tightly around the stake.
Proper Installation
Soil packed firmly
around all sides
of the stake
The stake should be fully seated and stable. Pack dirt firmly against all sides to prevent movement from rain, foot traffic, or freeze-thaw cycles.
Step 8 – Test Operation
- Restore power at the transformer.
- Verify the path light illuminates properly.
- Check that all wire connections remain below grade and protected from moisture.
Final Inspection Checklist
- New 8-inch stake installed correctly
- Fixture wires routed through stake openings
- Two or three wire connections reconnected properly
- New waterproof direct-burial connectors installed
- Stake firmly secured in ground
- Soil packed tightly around stake
- Fixture stands straight and operates normally
- No exposed wiring above grade